Friday, November 6, 2009

Create your Headboard that You Want

Headboards make the bed and room so much better, bigger, comfortable, and simply more pleasing to the eye. Without one, it looks like something is missing-with that big wall starring at you. You don't need to spend hundreds off your moolah to get a nice bed or headboard though. There are so many ideas online, magazines, tv, and your own creativity.
Anyway, I had a whole matching bedroom set, but it was too big and I wanted something different as well as something that would give me more room. I wanted a different style for my room.

I used the cheapest plywood they had at Home Depot (like $14 for a huge piece), which they cut for me. For a full sized bed, I used about 63" by 55".. Iyour's can be any height you want, but make sure you make it stick out a little on the sides as well. Just measure the width of your bed, and how heigh you want it to go. Mine sticks out about 2 inches on each side,  it looks much better that way then to be the exact width of the bed.
This is the time you also need to decide whether you will be screwing the headboard to the wall; screwing it to the bed frame; or just letting it sit there right between the wall and the bed as I did-of course the easiest choice.
Instead of plywood, you can use an old door, canvas, the headboard you may already have, create a rectangle with peices of 2x4 etc, or whatever else you can come up with!
You can also cut the plywood to make it any shape or design you want-I just went with the regular, easiest style and I do like the simplicity of it.

Other supplies I purchased for the headboard I created, but yours may vary:
*Foam (on sale at Fred Meyers, $12 or so, laaarge peice)
*Batting (off the roll from Fabric Depot) =about $6
*Spray adhesive to use between plywood, foam, and batting (bought at FabricDepot) $9
*Microfiber Material ($24?)


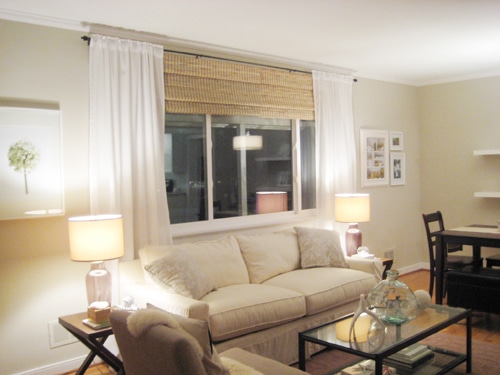


Low-Budget Decorating, High-Style Looks


This is from hgtv.com. Great info for everyone. Looove it!


Revisit what you already own. Refurbishing existing pieces is the best way to do some inexpensive decorating.

Sandpaper, primer and paint can transform just about any piece of furniture. Don't throw something out because you're tired of the color, and don't pass up a good deal on a piece of furniture just because you don't like the finish. You can easily change it.

Shop online. Peruse your local online classifieds. There are some great deals to be found. Listings in classifieds often have photos attached, so it's easy to find exactly what you're looking for. Online closeout sites are also a great way to save money. The best part is you don't have to drive all over town hunting for things.

Learn to sew. Check for inexpensive classes in your local area. Sewing your own drapery, bedding and pillows will save you a ton of cash in the long run. By sewing your own decorative accents, you have a vast array of fabrics to choose from. Plus, sewing can be a lot of fun.

When choosing a paint color, pick one shade darker or bolder than what you feel is safe. Go out of your comfort zone, and you may be pleasantly surprised. Painting is inexpensive and easy to apply, so experiment.

If you're short on space, purchase multi-purpose furniture pieces. One of my favorite space savers is the ottoman/coffee table/storage unit combination. It provides seating for company, a place to set down your remote controls and drinks on trays, and also opens up to provide storage.

If you have the space to do it, pull your sofa off the wall. A nice sofa console placed behind the sofa will give your room more interest and a division of space.

Avoid the catalog look. I know it's tempting to buy an entire matching living room or bedroom set from one store because it's easy one-stop shopping. But to personalize your space, buy unique pieces from different places. For example, pair a new sofa with a really cool, vintage coffee table from your local thrift store.

Don't underestimate the power of draped window treatments. Hang your drapery panels wider and higher than the actual dimensions of the window. You'll create the illusion of a bigger window and make your room feel larger and more grand.


(YoungHouseLove.com)

Keep your backdrop (walls and furniture) neutral. This is a great tip for those who like to switch up their color schemes with pillows, candles and other small accessories. You can do this as often as you like to suit the time of year or your mood. Neutrals have come a long way, although black, white, gray and beige tones are always good standards. Don't forget about the new neutrals, which are basically the lightest and most muted version of any color.


Thursday, November 5, 2009

Spray Paint The Old, to get In with the New.


I wanted to new bedroom, but with out all the spending.Soo.. I decided to try taking what I have and making it what I want. 
This is before picture of a nightstand, that is totally out dated. Check out that fancy "gold plated" outlines, oooo baby bling bling! And the fake wood covered something..
To paint two of these, I bought about 4 or 5 cans of semi-gloss black spray paint from Home Depot. It was about $2.89 per can. I then lightly sanded the shine off the nighstand. I did try to spraypaint without the sanding, and it seemed to work fine. However, to make sure to prevent any bubblying or future peeling, I took the safe way and sanded them (doesn't take long anyway). 
I also took off the hangles as I won't be using them, and just threw them to the curb. I taped magazines on the inside so when I sprayed after I took the drawers out, the inside wouldn't get black as well. You don't haaave to do this, since no one will see the inside anyway, but if you want to make it a cleaner look.

Me likeey!


Yaaayyyyyyy!! After!!!  I didn't put the bottom drawer in so you can see the inside was taped/masked off giving it a sorta clean look. I spray painted about 3-4 coats, lettting the first two dry few min's in betwen and I actually did the last 2 coats the next day;  I read this works better.
One side for some reason wasn't smooth and bublled so I had to sand it again after two coats, made it smooth, and sprayed 3 coats over again.
Simple, on the budget side, new handles.
I know the paint looks perfect on the picture but it isn't really all thaaat perfect; still very pleased with the results. Under $32 bucks for two new, modern, nighstands beats it all!